I got up this morning and jumped into the case fan install project. It seems to have gone pretty smoothly; the pc is back up and running and the fan control is operating all of the fans. There were a couple of setbacks, but nothing major, I will go into them in a minute.
I consider myself to have a moderate knowledge of computer hardware, and that was more than sufficient for this job. I also consider myself to be relatively skilled in the all-purpose-handyman type skills necessary for the install, but honestly it was easy enough that I would expect someone with little or no skill or knowledge on either subject would be able to complete this. From powering down the pc to having it back up and running took me roughly two hours. I could have done it quicker, but I was stopping to take pictures, and I was extremely nervous when I got the power tools to the case and took it really slow.
Tools: Adding the case fans only took a screwdriver, but cutting the hole for the top vent fan required a Jigsaw and a Dremmel High-Speed Rotary Tool. You could probably accomplish it with only the rotary tool, but I lacked the bit to make circular cuts in metal, so I used to a jigsaw to cut the shape and the rotary tool to smooth the edges. And I really do recommend the rotary tool and not just a drill; the rotary tool can smooth the edges, quickly punch the screw holes, and can be used to clean up any rough edges the other tools leave behind. You will also need either a silver sharpie or a knife for marking the case.
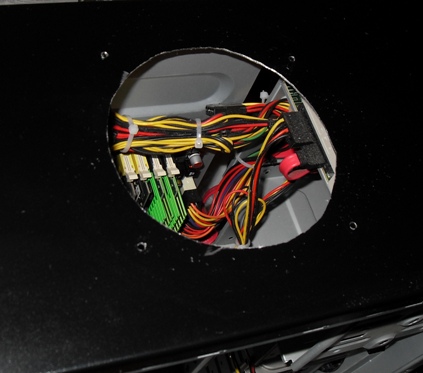 Here we go. I stopped for the first picture after I had made the cut in the top of the case and punched the screw holes. I used one of the metal grills that I bought as a template and etched a line around it with my pocket knife (this would have been easier if I had a silver sharpie, but I didn’t). I used a jigsaw to make the rough cut, then smoothed the edges with the rotary tool. I used the same grill as a template for the screw holes; I held it in place with one hand, put the rotary bit into each of the mounting holes, and drilled through. It took a bit of light grinding to get the holes large enough to accommodate the screws, and it was also necessary to grind the underside of the case to flatten out the raised edges the drilling had left behind. In the picture you can see all of the electronics, and unfortunately I did have to make the cut with the tower assembled; the top is actually riveted to the frame so I had little choice. I put a scrap piece of cardboard between the top and the electronics while I was making the cuts, it kept the metal shavings from getting onto the delicate parts.
 As you can see the cutting and grinding left some exposed edges. I wish I had thought ahead and bought some high gloss black paint to hide the edges. The majority of what you see here though is just metal shavings that didn’t come off with compressed air. I was able to clean them up with a rag and some alcohol later, so all you can really see at this point is a little silver ring right around the edge. The hole didn’t come out exactly round, but I didn’t really expect perfection here. The fan and grill are covering the hole from both sides, so pretty damn close to round is good enough for my purposes. Of course if I had been doing this for someone else I would have spent a lot more time on this portion of it, making sure to get the hole exact and the edges finished, but for me this was perfectly acceptable. You can pick up a three pack of these black metal grills on newegg for about 5 bucks. You should always cover the exterior fans, but an exhaust fan just needs something to make sure nothing falls into it and these do nicely.
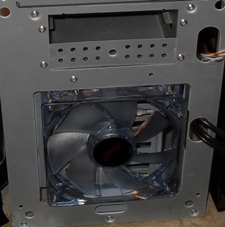 Installing the front fan actually turned out to be more work than installing the top one. Getting the front panel off was a bit of a chore. There are little plastic clips wedged between the HDD bays and the sides of the tower that you have to squeeze and pull forward to get to release, this took me needle-nosed pliers and a lot of patience, though I imagine all towers have these installed differently. In addition to the plastic clip hassle, the screw holes for the fan were much too small for the screws to fit through, so I had to drill them out. Unfortunately the area I was having to drill is so very close to the edges that I had to do it at somewhat of an angle. I went really slow and checked the size frequently to make sure I stopped before making them too big. Finally, I had to remove the Hard Disk to access two of the screw holes when I got to actually screwing the fan into place. As I said, installing this fan was probably more difficult, and definitely too longer, than installing the top exhaust fan. I should also point out that I was so paranoid that I was going to install the fans backwards that I must have checked each of the air direction arrows half a dozen times before I tightened down the screws.
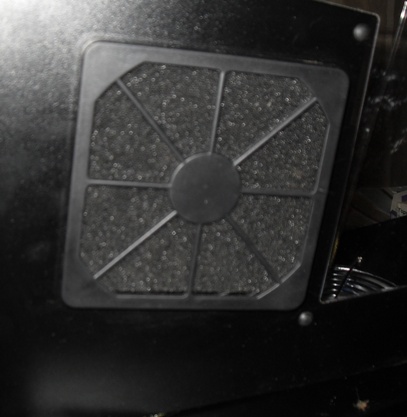 The side fan was very simple to install, that was why I saved it for last. This is the same fan as I installed on the top and the front, but this one I put a grill and filter assembly onto. Of course keeping dust out of your machine is paramount, so wherever possible you should put filters onto your intake fans. I think this grill and filter set cost 6 bucks on Newegg. The outer cover of it snaps off so you can clean out or replace the filter, and there is actually a grill hidden by the filter that looks just like the one I put on top of the case, only made of plastic. Bear in mind that it is made out of thin plastic, so take care when you are removing and replacing it. I briefly debated putting the filter on the inside of the case with the fan blowing through it so that the LED’s would show more prominently. In the end I opted against that, knowing that I would probably never pull the case apart to clean the filter, this way it is staring at me all the time, hopefully it will guilt me into it.
 The fan control was actually really simple to install. Especially so since I already had the front opened to put the fan in. There is a jumper on the circuitry that allows you to set the temperature display to Fahrenheit and Celsius, I opted to move it to Fahrenheit so I wouldn’t have to keep a calculator handy to figure out how hot it was. The instruction page for this was done in about 7 different languages and I couldn’t find the English portion most of the time, but the circuit board actually had print on it -in English- that said “Fan 1”, “Fan 2”, “Temp1”, “Temp2”, etc. I just went by that for the cable routing. I ended up with one temperature sensor each at the top, front, and bottom of the case, with the fourth actually attached to the housing for my Power Supply. The instructions did have a warning about getting the wires too close to heat sinks, and I was independently worried about them getting into the now plentiful fans, so they just ended up more or less right where the fans were installed -even if that was not the place I really wanted to know the temperature. Also in the picture you can see that the top exhaust fan install is actually much smoother than it appeared in the other pictures. And you can see that fine layer of dust all over the machine. This dust is all from the install process, as I dusted it thoroughly prior to the install, so make sure that you use compressed air liberally inside the machine before you power it back up; I must assume that this dust is from grinding the metal, and I can’t imagine a more conductive material than metal powder to short out your Motherboard.
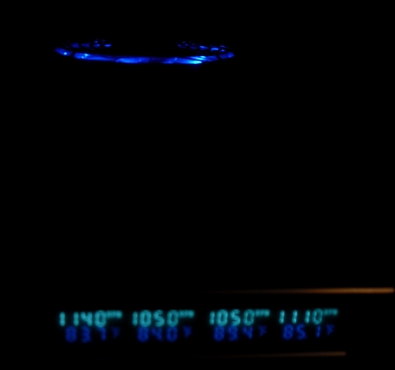 Here is the fan control just as I powered it up, you can also see the LED’s of the top exhaust fan. I have all of the fans set right about half speed as I am checking to make sure I don’t have any phantom noises like scratching, scraping, or thermonuclear meltdown. I didn’t realize until I actually had the machine back together that this fan control allows you to turn off each of the fans, which is nice, and that the LED’s dim with the speed control. I also didn’t realize until I had it back together that the stock exhaust fan is only capable of running at about half the RPM of the new fans I installed. While the others can go to about 1900 RPM (as read on the fan control) the stock one can only do 1050. I wish I had bought one more fan and replaced it, although I’m fairly certain the other three fans can make up for it.
 When I bought the fans, controller, and grills, I got a free blue (my choice of red, blue or green actually) dual cold cathode lighting kit. I went ahead and put it in here, ’cause what the hell else am I going to do with it? As you can see by the mass of wires on the right, I’ve never been one for the “finishing touches” aspect of this type of work. Thankfully that cold cathode lighting kit has a switch (that mounts into an empty pci bay -which I have about 6 of with no corresponding slots on the motherboard) that I can easily turn off. Which is how it will remain unless there is someone who really wants to see just how bright I can make that mess of wires look.
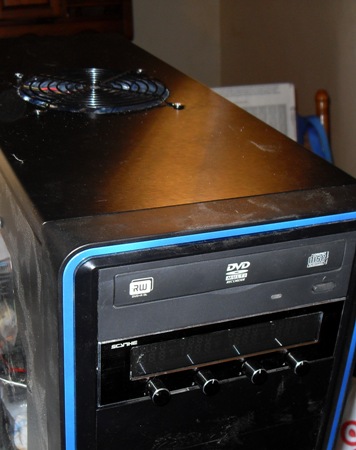
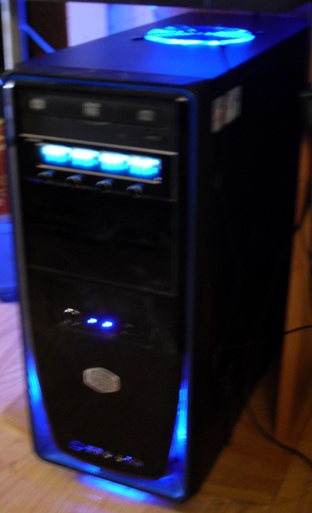 Here is the finished product in as near darkness as I can get it at noon in Arizona. My camera has some weird feature that makes it so the flash free photos take a second (well fractions of a second, but it’s relative; it takes longer than instantaneous) to process, and that makes for slightly blurry photos. I have to admit that I am very pleased that I went with the LED fans. They really do transform it from being just a plain metal box to something… well, to something. I especially like the way the front intake lights up the trim around the bottom of the front. And in the dark that top exhaust fan looks like it was meant to be there. I have spent a lot of time working with computer hardware, but this is the closest I have yet come to any actual modification. It was easy enough, and the result is eye-pleasing enough, that I won’t hesitate to do it again if I should ever find myself in a position where I need to.
The total cost of this install was about $75 shipped from Newegg. That includes three 120mm blue LED fans, the Scythe fan control unit, the three pack of black metal grills (of which I only used one for this install), and two of the grill and filter packs (again, only one used during the install. I was planning to put one on the front intake, but the difficulty of getting to the fan nixed that idea, it would take me an hour to clean the filter). As I said, it took about two hours from power down to power up. That includes the time spent searching for stubby screwdrivers, digging out a flexible screwdriver extension, trying to find my new jigsaw blades, ’cause dammit I know I just bought some, etc.
Cutting into the case was really quite intimidating for me, and I wasn’t able to find a “how-to” type guide to answer any questions I had before going into it. It turns out that the case actually cuts quite easily with a standard, all-purpose jigsaw blade, and as long as you take your time for the cut it will look just fine when you are done. If you happen to be thinking about doing this either because you need the additional airflow, or just for the eye appeal, don’t hesitate to do it; it is really pretty simple, and the result looks pretty cool.

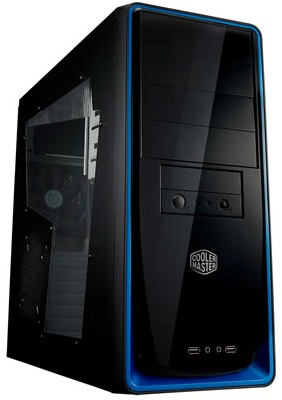 On the right here, you can see the case that my new machine came with. I’m not a huge fan of the overall design of the thing, I mean the window in the side could be a cool idea if there was anything in there to look at, but as it is all you can see is the dull gray metal of the case. I have, however, had the time to think it through, and I think I need to retract my previous statement about the box being too big. That, it seems, is a good thing. All the little parts in there generate a lot of heat, and in order to get that heat out I am going to need some serious airflow, the open space makes it easier to move the air. The case came with a 120mm exhaust fan pre-installed on the back panel, and there may or may not be an intake fan installed on the front under the logo (it is an option for the case, but I didn’t pay much attention when I opened the case to upgrade the ram, and can’t tell observing from the outside), and a spot to put one on the side of the case. I am going to put all of those to use, and I am going to add an extra exhaust fan on the top. I am going to go all out on this, I want to see just how much I can improve performance with nothing but cooling fans.
 Fans are dirt cheap. I really had no idea. I never really thought about how much they might cost, but I would have assumed they had to be more expensive than the 5 bucks a piece I dropped on these Rosewill fans. The manufacturer had a lot of good reviews for fans and power supplies, the price was right, and the LED’s, well, I dunno, maybe they will add a cool factor, or maybe they will just be annoying. I am not in the room with the PC when I am sleeping or watching TV, so I don’t imagine they could be much of an annoyance, but I somehow doubt they can transform my plain case into an otherworldly piece of alien technology…But I have been wrong before.
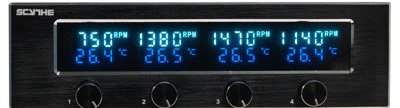 One other thing that I bought for this project was a Scythe fan controller like the one pictured. I am honestly not 100% sure if this was actually necessary, but I did like the idea of being able to control the speeds; I have no idea how loud this is going to be with all four fans, plus the PSU fan and the CPU fan going on full speed. If it is deafening I would like to be able to turn it down a bit.