In the past, I’ve seen where people have given names to their model cars. They are usually affectionate names like Purple Thunder or silly puns like Steven Squealberg. Following in that vein, I’ve dubbed the GTX, my first model car in thirty years, First Pancake. Despite all my research into painting techniques and various building tips and tricks, I keep fucking it up in ways I hadn’t previously considered. As mentioned in a previous post, this one is the first pancake: it just doesn’t look as good as the rest of them. I’m learning from each of the aforementioned fuck-ups, so hopefully project Second Pancake will come out a bit better.
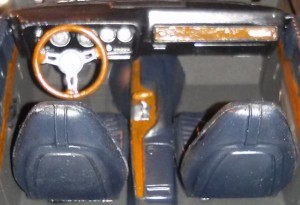
 Nonetheless, work continues on the GTX, and the interior of the car continues to be the best feature. The dashboard in particular looks really good. With all the parts in place now, it is a pity I am going to have to stick it into the car where no one will ever get to see it. The images make the seats look almost blue, but without the flash they are very nearly black. In person, you can hardly tell the difference in color between the seats and the dashboard. I wish I was able to get a sharper picture of it before it gets tucked inside the car but my camera just won’t let that happen.
 Another problem I’ve run into (and another one that always plagued me when building these in my youth) is getting the exhaust and manifold welded together. I’ve looked over all sorts of tips and tricks for this, the most common of which seems to be alligator clips, but even with alligator clips, I find it still slides. I decided to take a crack at it with just masking tape. I just placed a piece beneath the portion where they connect, applied some glue and pinched the tape back against itself. I did it this way because the tape sticks to itself way better than it sticks to the paint, and it also allowed me to continue pinching it together once every couple of minutes to ensure it was still tight without fear of damaging the bond. I glued only the exhaust and manifolds together first, thinking that lining the whole undercarriage up might put pressure on it from unusual directions. This worked quite well, but I did get some bleeding of the silver paint into the grey paint and vice versa.
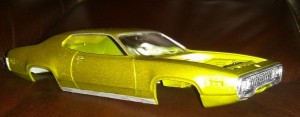
 I’ve got the glass in, bumpers on and trim painted. It doesn’t necessarily look as bad as the new nickname would imply, but there are many things about it that simply could look much better. There are lots of blemishes in the body paint, the bumpers don’t quite line up, etc. I had planned to use Bare Metal Foil
 for the trim pieces (as I did for the grill) but gave up on that not wanting to waste the foil on a car that isn’t going to be anything close to presentation quality. The trim doesn’t look nearly as flat as the photo makes it appear, though it would look considerably better with foil instead.
I’m coming up with a regular laundry list of things I’ve learned from building this thing. Like, apply the mirrors at some point before doing so will destroy the paint job. Paint the window trim before you install the window. Make sure to buy a small bottle of paint in the same color as the body for touch up (and parts that should be body color but it isn’t immediately apparent that they should be). It is much easier to add another coat of paint than to remove one. The list goes on and on.
I should have First Pancake finished within a few days. I still have some final detail painting to do under the hood, still need to do final assembly and still need to add the decals. Aside from that, it’s as done as it’s going to get. I’m hoping that I’ve learned enough from the first one to make the next one come out a bit better. The next kit I chose is a Revell ’50 Olds Coupe. This is a level three kit, which is probably far more ambitious than I have any business trying. Time will tell.
I’ll add photos of project First Pancake once I complete final assembly and get the decals in place.
