
When I was young, I always liked building models. At least I enjoyed the idea of building models. In practice, I was far too impatient to do it with any sort of success. I would greet each new kit I would get (my aunt, Janice, would get each of us a kit every year for Christmas) with an enthusiasm that is hard to match in my adult life. It was the enthusiasm of a child, but always mixed with the ultimatum that this time, I’m going to do it right. Fast forward an hour and I have realized that the paint on the body has brush strokes all through it, I’ve managed to get a big fingerprint right in the center of the hood, and somehow there seems to be cat hair under the paint on the trunk (we didn’t have a cat). My disappointment would be almost as great as the initial enthusiasm. Being ten or twelve years old, I didn’t have the patience, dexterity or supplies to finish a model like it looked on the box. I could usually get the engine to look okay, but the rest of it would look horrible.
I lacked not only patience, but also proper supplies. The buy-in to build a model kit can be as little as the cost of the kit and ten bucks worth of glue and paint, but you can’t get decent results with those meager supplies. Buying the proper supplies -primer, liquid enamel paint, spray paint, clear coat, knives, sprue cutters, glue, clear glue, sandpaper, sanding cloths, sanding sticks, buffing cloths, needle files, polishing compound, and on and on- can get horribly expensive.
 In my adult life, I frequently see other people building models and think with the proper supplies, I could do that. With inspiration from my brother-in-law, I’ve decided to put that to the test. To the right is the model kit I’ve decided to start with. I wanted to build a ’72 Roadrunner like the one I rode around in with Dave back in high school, but the kit for it doesn’t exist. The nearest I could get was a ’71 GTX. I’m going to make a couple of slight modifications to the kit (which I won’t list just yet as I’ll have to see if my ability to do so matches my eagerness to try) and have found paint that should get pretty close to the one from my teenage days. I’ve spent far more than I care to admit to acquire some decent, entry-level supplies (entry level for a serious adult modeler – which is still quite expensive) and have done considerable research into painting and finishing techniques. We’ll see how it goes. Here I should also note that I have so much confidence in my ability that I actually bought two of these kits with plans to experiment with different paint colors and techniques on one of them (which will ultimately become either spare parts or trash).
The first issue with these model kits -the part that, to me has always screamed amateur- is the pre-chromed pieces that come in the kits. In the kit I am building, the bumpers and a few other pieces come already chromed. The issue with that is that the grill -all of it- is in chrome. Not just the parts that should be chrome -the trim parts running around the edge of it- but the whole thing, even the parts that should be a dark color because they are, theoretically, the parts where you can see through to the radiator. In the picture from the box (inset above) you can see that they have painted those parts dark to make the grill look more realistic. I’m not sure how they managed that since the portions that need to be painted dark are only a couple of millimeters wide. I know I don’t have the ability to use a brush with that level of precision.
Before I decided to buy a model and give it a go, one of the things I researched was how to strip the chrome from these pre-finished pieces. I found a video on youtube that said it stripping the chrome was as simple as soaking the parts in bleach for a few minutes. I was a bit skeptical, since that seems so darn easy. The first thing I did when I got the kit was to clip a piece of scrap from the chromed pieces and try this (the videos I found are all British and the bleach they use is thicker than what is available to me, so I wanted to check it on garbage first). It turns out that it was just as easy as the video shows. I got the cheapest bleach available at the local dollar store for my purposes. It took about two minutes for large, flat pieces and about ten minutes for pieces with the smaller detail (like the grill of the car I am working on). I actually soaked it for a few minutes, rinsed it, soaked it a few more minutes, rinsed it. I agitated it while doing so to get some of the pesky bits that were stuck in the corners, but in about ten or twelve minutes, it was stripped down to white plastic.
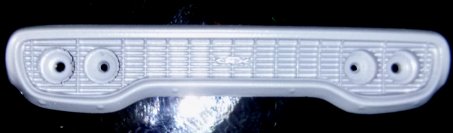 The grill of this model was one of two things I thought I might have issue with, and thus the part I wanted to work on first. I didn’t snap a picture of the grill with the chrome or during the chrome stripping (there’s a link above to a youtube video of the process), but once I got it stripped and primed, I was pretty happy with the results. Getting the chrome off of it made the details really pop when the primer coat hit it. My particular kit had a lot of stray edges and plastic around the headlight openings and throughout the detail work which took me a good half an hour to clean up with an x-acto knife and a q-tip, but it cleaned up pretty well.
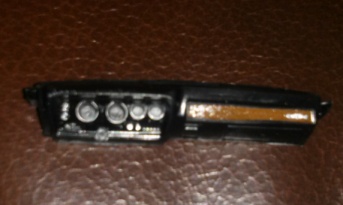
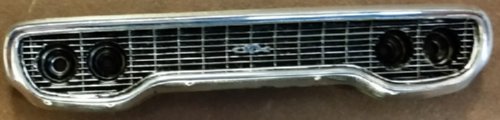 Here is what it looks like with some flat black and bare metal foil applied. It’s not perfect, but it’s my first model detail painting in a couple of decades. Now if I can get the body paint down, I’ll have passed the second major hurdle I was expecting. (As an aside, I can’t continue working on it because I’m still waiting on the paints I ordered from Hobbytown.com. Do not buy supplies from them. They were one of a handful of sites that had the color of body paint I wanted and they offer flat five dollar shipping, which is what suckered me in, but four days after completing paypal checkout for my order, they still haven’t even processed the order, let alone shipped it. I reordered many of the paints from TowerHobbies.com, in slightly different shades so I wouldn’t have duplicates, and they had them in the mail the same day. I should have them tomorrow – meanwhile, Hobbytown still hasn’t processed my order. Very frustrating).
The second thing with this car that I thought I would have issues with is what has plagued me since I first put brush to plastic on my first model: the body paint. Youtube has a ton of tutorials on how NOT to make it look like your car was painted by a developmentally challenged six-year-old, and I watched most of them. I found this 5 part series to be quite informative. A lot of the tips are really no-brainer type stuff, but the tutorial is broken into smaller videos which makes navigating to the part you are interested in easier. Part three has a lot of information on polishing the paint once applied, and while I won’t be using the same products they did (which are horribly expensive) the same techniques will apply to any finishing compound.
 My biggest takeaway from all the videos I watched was the whole part of applying many thin coats instead of one thick coat. I can clearly remember trying to get all the paint on in one application when I was doing these as a kid which led to pooling and dripping. When I applied the primer to this one, I did it in three very thin coats. The photo here is after finishing the third coat. I still need to hit it with some wet/dry paper to smooth out the texture (I’m going to wait a day or two since I still don’t have the body paint anyway), but aside from that it looks pretty darn good. I used an 1800 grit sanding cloth between applications to remove blemishes and take excess paint off of the emblems, trim and door hardware (which probably wasn’t strictly necessary) and it left the final coat looking pretty darn good. I could leave it as is and it would look better than the finished paint job on the last model I built (some thirty years ago).
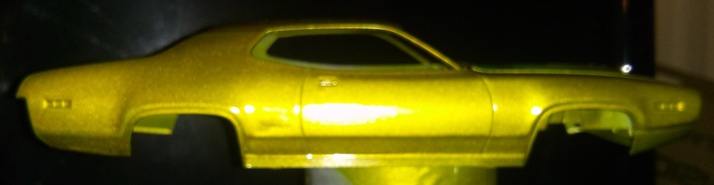 I finally received the paint I ordered from Hobbytown -a full ten days after ordering it- so I could get to work on the body. The color I chose is called ‘Lime Gold Metal Flake’. Note the words metal flake at the end. In my naivete, I assumed that metal flake paint would go on just the same as normal paint and just look kind of, well, flaky. Nope. Not at all. My first two mist coats were impossibly lightly sprayed -to the point that the car was still mostly primer after completing them- but there were still pools and drips galore in the paint. It took a ridiculous amount of sanding and smoothing to get it to look even remotely uniform in color (this could also have something to do with the age of the paint. This color has been discontinued but I don’t know for how long. It could have been sitting on the shelf for years). The picture I posted here doesn’t do the finish justice; it is very smooth and looks wonderful… Except some discoloration on the driver’s door that I just couldn’t sand/polish away. It’s like I told my brother-in-law, It’s going to be like your breakfast pancakes: the first one never looks very good.
There were a couple of other issues on the body paint front: 1) I was nearly out of paint by the time I started doing the scoop on the hood (which is in black on the model image, but which I wanted to make body color and it doesn’t quite match). 2) I failed to install the side mirrors at any point during the painting process. I have them painted, but not installed. If I attempt to install them now, it will totally fuck the body paint and I used the entire can trying to get the rest of it smooth. It looks like this one might not have side mirrors.
 Having now established that I not capable of finishing the body paint in anything approaching a professional manner, I jumped right into the interior detailing. My first attempt was with a brush and came out horribly. So interior pan number one got thrown aside. Interior pan number two, I took a different approach and bought some off-the-rack Krylon Fusion paint in a satin black finish (I bought several cans in other colors as well). This stuff goes for four bucks a can, is about three times the size of Testors, Model Master or Tamiya paint and dries enough to work with in fifteen minutes instead of hours. I wouldn’t try to do a body finish with it, but for interior and undercarriage type stuff it does the job just fine. I sprayed the whole pan in satin black then went back in and added wood grain and silver where necessary. I also hand brushed the seats, tufted parts of the doors, and the center console in a semi gloss gun metal color which is why they appear to be a slightly different color. This part came out okay, but I got a little sloppy with the wood grain color. It was a lesson learned.
The motor presented me with another dilemma. This one was just about color. Mopar has used way too many colors for their engines over the years, some of which were used only briefly (some only for a single model engine). The 440 six pack on this one should be done in a pale orange. However, I remember the engine from Dave’s Roadrunner being red. This could be the product of a faulty memory or aftermarket paint, but I do know that Dave’s didn’t have the famed 440 six pack (I believe the motor was dropped in 72 to meed stricter emission guidelines). Red was a color used on other Mopar engines at the time though, so that is what I went with. Also, I’d be lying if I said that not wanting to buy a bottle of orange paint for this motor and knowing I would never be able to use it again wasn’t a factor. Below, you’ll see the standard 440 six pack color on the left (and, incidentally, I believe that is the body color I was trying to match) while the image on the right is the non 440 six pack color I was shooting for.

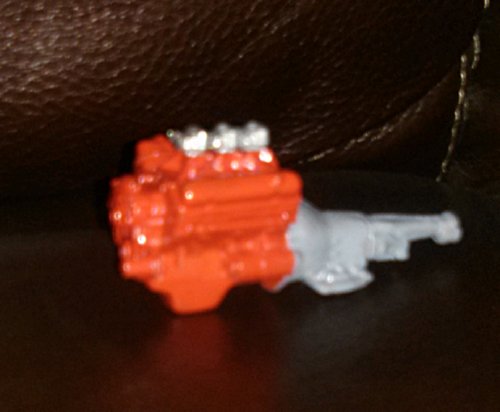 For the engine, I went with another Krylon paint, this one in a satin red. I painted all the engine parts this color (including the chrome) before going back over it with a brush and Chrysler Engine Red paint. The red engine paint is a close enough match for many muscle car motors so I’ll get some more use out of it later on. The only piece of the engine that I didn’t do in standard engine color is the carburetor. This came finished in chrome, which I painted over with some metallic gloss silver to look a bit more like an actual engine component. It pained me to paint over the shiny chrome valve covers and air filter (which were usually the first two pieces of any V8 motor that I would rush out and get in chrome when I was driving such cars). Keeping the first pancake theory in mind, I’m not going to do a lot of detail on the engine. I did the belts and pulleys, hoses and etc. but I’m not going to go so far as to do the starter and other components since this model will likely be hidden away once I finish my second pancake.
 Next up was the dashboard. Having learned a lesson from my freehand painting of the wood grain in the previous image, I took the time to lay down some 10mm Tamiya Masking Tape
 for this. The edges of the wood grain are much sharper in this one and without a lot of bleed. The masking tape was worth the few bucks and it is much easier to maneuver around uneven surfaces and corners than a larger tape. I also purchased some FrogTape
for use on larger areas. The dash is supposed to have wood grain around the instrument cluster and stereo knobs as well, but I didn’t think I would have been able to pull that off even with masking tape. Instead, I did it all with Krylon satin black and followed up with some flake silver paint to circle the instrument clusters and coat the knobs as well as the GTX logo in the wood grain. The dash looks so much better than the interior pan. Already on my way to my second pancake!
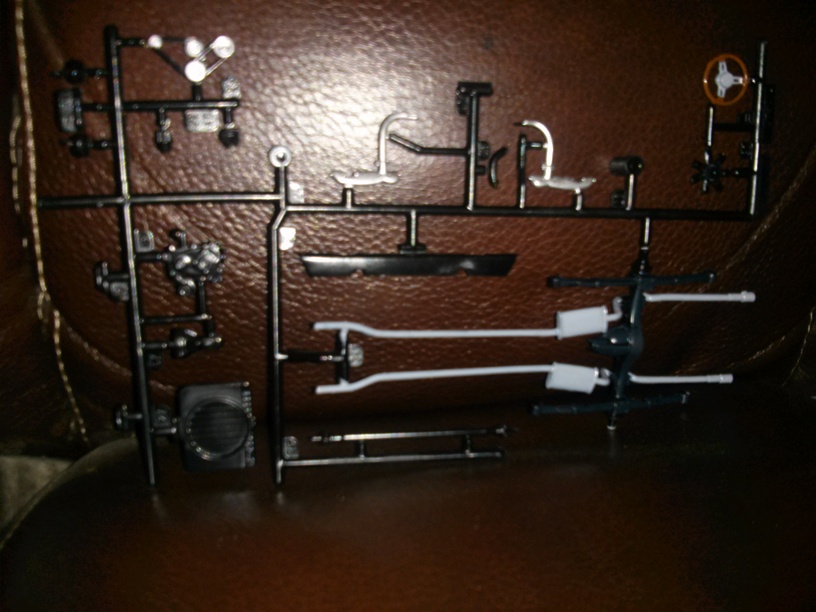 I still have a ways to go on this, but I do have most of the painting done (I’ve found, as many modellers lacking supplies have, that it is easier to paint the small parts on the tree and touch up after the fact than to cut them out and paint them later. If I build another model I will probably invest in some alligator clips on a stick
 so I can cut the sprues and trim the rough edges to eliminate painting everything twice). I went my own way with most of the colors here. The whole thing is painted with Krylon satin black and most of the rest of the components are painted up and ready to got. I thought the steering wheel would look better in silver and wood grain than black with a wood center that was recommended. The silver for the exhaust manifolds and gray for the pipes feels right (and hopefully will look right, too). I did the leaf springs, axle and differential in the gun metal semi gloss so it would be a different color than the flat black frame (I don’t think it looks right when you flip a model over and everything except the exhaust is the same color). I also have a drive line from the other kit that I did with both black and gray to try to make it look not so brand new. I’ll see which one I like better.
Pingback: Project ‘First Pancake’ |