
When last I checked in, I was waiting on some Sharpie Oil-Based Paint Markers, Extra Fine Point, Metallic pens to try out for the purpose of chrome detailing. They have now arrived, and they simply don’t work for the intended purpose. The directions for use of the pen read thusly:
Remove cap. With marker it tip up position, depress point with finger. Recap and shake well to mix paint. Depress marker point several times on surface to saturate point.
Based on that, my expectation was that the point would become saturated, after which you would be able to use it like a normal pen. Not so much. When you ‘depress marker point several times on surface’, the paint runs down the outside of the pen to get to the tip. This means that the paint is pooled up on the instrument just above the tip and the second it touches anything, paint goes everywhere. ‘So,’ I thought to myself, ‘now that the pooled paint is gone, it will work like a normal pen’. Wrong again. Once the paint that is on the outside of the instrument is gone (which I technically cleaned off with a towel so I wouldn’t accidentally pour it on my fine detailing) the actual tip of the pen is bone dry. I could dip the tip into the puddled paint and apply it that way, but then it’s exactly the same as using a toothpick and some Silver Model Master paint, except that I’m out the four bucks on the pens. And while it’s true that the paint costs a few bucks (seriously, if you’re buying paint, buy a bunch of them from either Tower Hobbies or find a seller on eBay who has a ton of colors avaiable and will combine shipping and get them all at once. On Amazon, some bottles are two bucks and some are seven with no logical reason why), you will then have it for your next project as well. Not like the pens which will dry quickly even if not in use.
 I didn’t sit down to write an op-ed piece on how much I hate Sharpie or start an I Hate Sharpie fan club though. I did find a couple useful sets of them for modeling. First up is Six Dollar set of twelve Sharpies
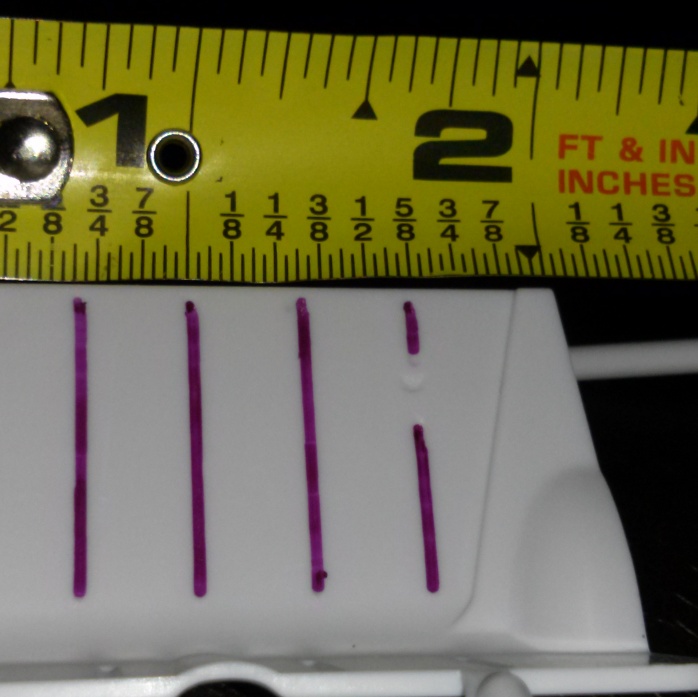
. They come in a dozen colors, though I expect the black will see the most use. I purchased them thinking I might use them to do some detailing on dashboards and seats where a brush is difficult to get. These are the ultra-fine point variety, but unlike the ones above, they work like a normal pen. To give you an idea of how fine the tip is, to the right is a piece from my current kit (a piece that would be used to build the rally version, and thus not one I will use). I’ve used the color they call ‘berry’ to color in some detail grooves that were pressed into the piece. As you can see by the tape measure, the seams are right at 1/32″ -less than 1mm- and it worked well. I did that freehand with zero preparation just to get a picture to post. Had I spent any amount of time on it instead of just running the pen up and down each channel three times, I probably could have made them look amazing.
 Next up is a set of Sharpie Metallic Fine Point Permanent Markers
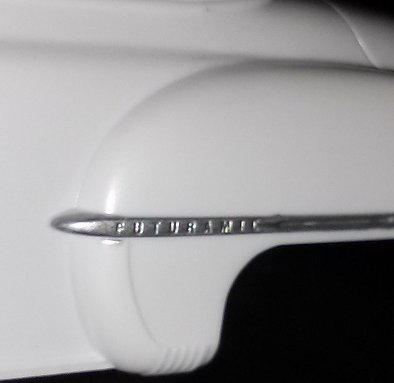
. This is a pack of six, with two each silver, gold and bronze. These have standard sharpie tips (which seem impossibly big for modeling) and work just like one would expect a marker to work. Using the silver one of these, I took a shot at the text on the chrome trim I was wondering how to finish in a previous post. Again, I didn’t properly mask the area and I just went at it freehand. The body still needs to be primed and painted and regardless of how I ultimately finish the trim pieces, they will have to be taped over during that process or the lettering detail will disappear anyway. I wasn’t able to achieve the look of the original (which has white paint in the center of the lettering), but the felt (foam? fabric? whatever the tip is made of) tip made application smooth and easy without the brushstrokes I would have gotten if I’d tried to paint it by hand. The paint is also much thinner, which leaves the most possible detail, and makes that lettering pop. For freehand, I did a pretty damn good job here (as far as you know. What you don’t see is the huge fuckup I made just beyond where I cropped it).
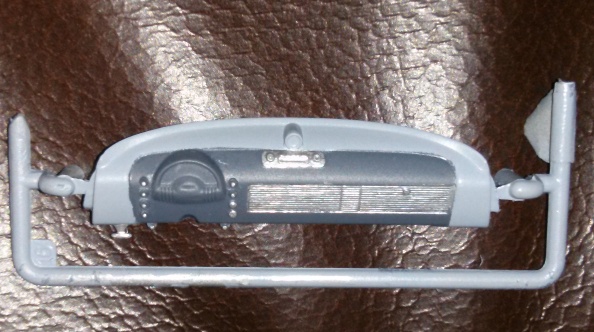 I used those same pens to finish my dash. In this case, I did tape off the one large grill-like portion before painting, but the radio and all the knobs were done freehand. From the top view, and not to mention due to the flash, the knobs look like only the tip is painted, but trust me when I say that they are painted all the way to the dash. Overall, I really liked the performance of the pens for this task. I don’t know that it would hold up on a piece that is constantly being handled, but for something that will be trapped away in the interior of my insanely-over-detailed -non-covertible- model, they worked perfectly.
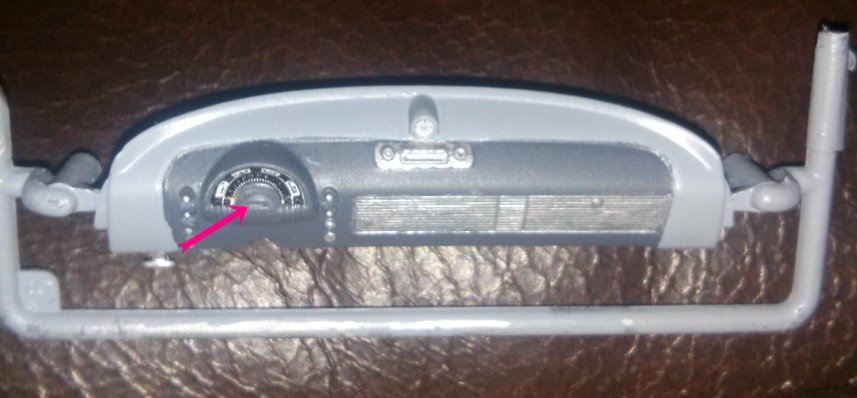 Lastly, another product I’m using for the first time is the combination of Micro Set Setting Solution
 and Micro Sol Setting Solution
. Prior to this build, I’d never used anything like these. However, nearly every video or tutorial I’ve watched or read has said to use these products (not another similar product, but these exact products) in the application of decals. For some reason, you can’t buy them as a set on Amazon. You can buy them as a set on eBay for under ten bucks -shipped. I’m taking it for a test run with the dash. In the photo (which is much less flattering to the silver paint from this angle, but keep in mind that the size of the thumbnail is about 300px wide on a pc -counting the tree- and that is very near actual size) you can see three decals: the clock, the speedometer and an odometer. Because the odometer is very hard to see, I pointed a big, pink arrow at it. There is no earthly way you can read that thing. Even under the magnifying glass, I could barely tell what it was supposed to be (and speaking of magnifying glasses, this photo was shot through the magnifying glass on my helping hand station. I had never given it any thought, but isn’t it odd that the camera doesn’t magnify when the photo is taken through it?) while looking at it. There’s no way you will ever see it through the window of the car, but I put it in there anyway.
In regards to the micro sol and micro set, I followed the package directions for use and now have to wait and see how they turn out. Early on it didn’t seem like they were doing much. Application of the decals was still a straight-up bitch. The decals just didn’t want to go into the correct place and orient themselves the right direction. After putting down several layers of the blue bottle both before and after application of the decals, I was thinking it may be like snake oil. After applying the red bottle and having let them stand for about an hour now, I can see why people rave about this stuff. Once the red solution is in place, you don’t need to touch it again. It melts (or whatever it is actually doing) them right into the nooks and crannies. After only one application, they already conform very well to their new homes. Directions say you can apply it again to make them conform even more. I plan to do so later today to see just how well this stuff can work.
Pingback: Wasting perfectly good OCD